7 Steps to Draining a Hot Water Heater
Draining a hot water heater is a key maintenance task that involves removing water from the tank, primarily to clear out sediment. This process is vital for both gas and electric water heaters to maintain efficiency and prolong their lifespan.
To drain a hot water heater quickly, begin by shutting off the water supply to the heater. This prevents more water from entering the tank during the draining process.
Next, turn off the power to the water heater; for gas models, turn the gas off or set it to ‘pilot’ mode. Before proceeding, give the water time to cool down to avoid the risk of scalding.
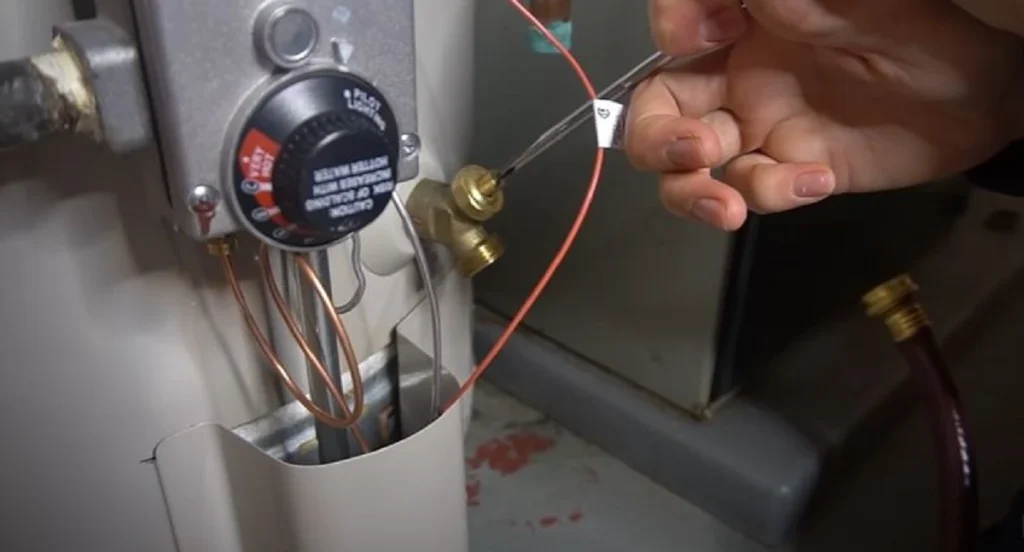
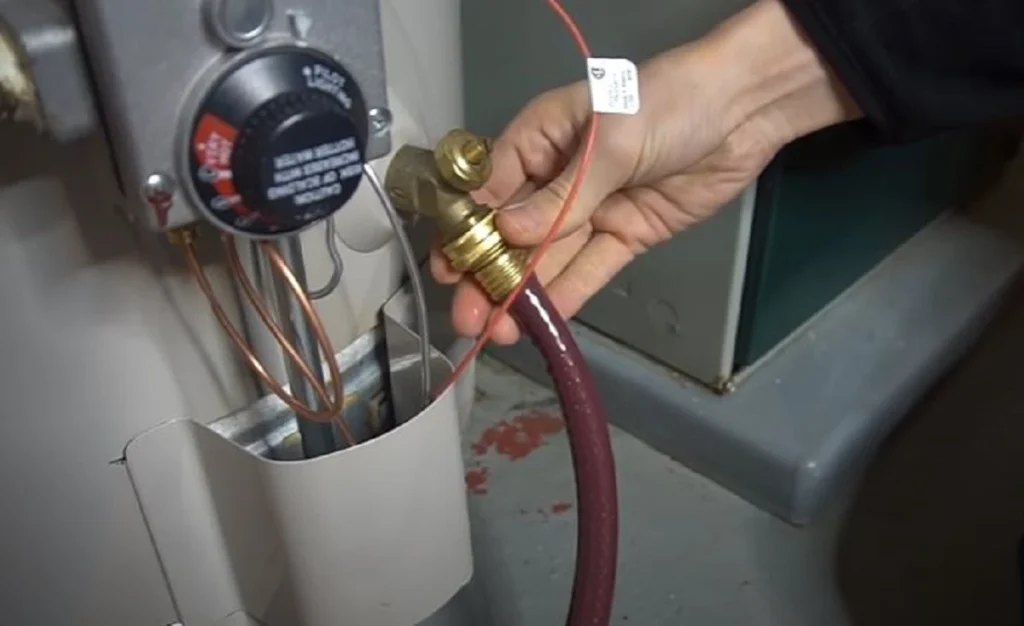
Attach a garden hose to the water heater’s drain valve, found near the bottom of the tank. If you don’t have a floor drain, make sure the other end of the hose is positioned in an area where hot water can safely drain.
To facilitate drainage and prevent a vacuum, turn on a hot water tap elsewhere in your home.
Open the water heater’s drain valve to start draining the water. This step will allow the sediment-laden water to flow out of the tank. The draining process typically takes between 20 minutes to an hour, depending on the size of your tank and the amount of sediment.
Once the water has drained completely, flush the tank by turning on the water supply with the drain valve still open, until the water runs clear.
Then, close the drain valve, disconnect the hose, and restore the water supply and power to the water heater.
Troubleshooting Common Drainage Issues
We get it – sometimes, draining your water heater doesn’t go as smoothly as planned. Don’t worry; we’ll tackle some common hiccups you might encounter:
No Water Flow: If water isn’t coming out, double-check that the drain valve is fully open and the hose is securely attached. It’s also possible that sediment is blocking the valve. Try briefly opening and closing the valve a few times to dislodge any debris.
Slow Drainage: Sediment buildup is a usual suspect here. If the water is trickling out, it might mean there’s a lot of sediment to flush. Be patient and let the water drain slowly. Flushing the tank with cold water can also help dislodge stubborn sediment.
Water Heater Not Refilling: After draining, ensure the water supply is turned back on and the drain valve is closed. If the tank still isn’t refilling, check for kinks or blockages in the water supply line.
Leaks: If you notice any leaks, tighten connections or replace worn-out washers. If the leak persists or is coming from the tank itself, it’s time to call a professional plumber.
How to Drain a Water Heater?
Draining a hot water heater is an essential maintenance activity that enhances the efficiency and longevity of your water heater. This process involves several steps, each with its unique significance in ensuring safe and effective drainage.

STEP 1: Shut Off Power or Gas to the Heater
Safety is paramount when dealing with any appliance. For electric heaters, shut off the power at the circuit breaker to eliminate the risk of electrical shock.
In the case of gas heaters, turning off the gas supply is vital to prevent any potential gas leak or fire hazard. This step also ensures that the heating elements do not operate dry, which can cause them to burn out.
STEP 2: Connect a Hose to the Drain Valve
The drain valve, typically located at the bottom of the tank, is where you attach a garden hose. This connection is crucial for directing the water to a safe location for disposal.
Ensuring a tight connection prevents leaks and potential water damage to the surrounding area. Using a hose also allows for a controlled and directed flow of water out of the tank.
STEP 3: Open the Pressure Relief Valve
Opening the pressure relief valve is a safety measure to prevent pressure build-up in the tank as water drains out. This step protects against potential tank damage or bursting due to pressure.
It also ensures a smoother flow of water out of the tank by allowing air to enter and equalize pressure inside the tank.
STEP 4: Open the Drain Valve
Opening the drain valve starts the process of water flowing out of the tank. This step is essential for removing the water and the sediment that has settled at the bottom of the tank.
Sediment accumulation can reduce heating efficiency and lead to increased energy costs. It can also cause damage to the tank over time.
STEP 5: Flush the Tank with Cold Water
Flushing the tank with cold water after it has drained helps remove any remaining sediment. This step involves refilling the tank with cold water and then draining it again.
It ensures that the tank is thoroughly cleaned, which is important for maintaining water quality and heater efficiency.
STEP 6: Close the Drain Valve and Refill the Tank
After flushing, closing the drain valve is important to prevent leaks when the tank is refilled with water. This step restores the water heater to its operational state.
Refilling the tank is necessary before turning the power or gas back on to avoid damage to the heating elements.
STEP 7: Turn the Power or Gas Supply Back On
Once the tank is refilled, restoring power or gas supply marks the final step in the process. For gas heaters, this involves relighting the pilot light.
This step signifies that the water heater is ready to resume normal operation, with improved efficiency and safety due to the removal of sediment and the replenishment of fresh water.
Post-Drain Maintenance for Hot Water Heaters
After draining a hot water heater, regular maintenance is essential to ensure its longevity and efficiency. Once the tank is empty, flushing out sediment is a key step.
This involves refilling the tank with water and then draining it again to remove any remaining sediment. This sediment, if left unchecked, can lead to inefficiency and potential damage.
Re-energizing the water heater safely is the next step. For electric heaters, this means restoring power at the circuit breaker, and for gas heaters, relighting the pilot light.
Ensure that the tank is completely refilled before restoring power to prevent damage to the heating elements.
Checking for leaks and any signs of damage post-maintenance is important. This includes inspecting the tank, valves, and connections for any signs of wear or leakage.
Draining Different Water Heater Varieties Efficiently
Electric vs. Gas Water Heaters
Electric heaters require shutting off the power at the circuit breaker, while gas heaters need the gas supply turned off. For gas heaters, it’s also essential to ensure the pilot light is extinguished before draining.
Tankless Water Heaters
Draining a tankless water heater often involves removing scale and mineral buildup. It’s a more intricate process that might require professional assistance, especially when dealing with the internal heating elements.
Water Heaters with Plastic Valves
Handle these with care as plastic valves are more prone to damage. Applying too much force can lead to breakage, resulting in a more complicated repair process.
Integrated Water Heater Systems
For systems that are part of a home heating system, additional steps may be required. It’s important to understand the interconnectivity of the system to avoid adversely affecting the home’s heating capabilities.

Draining an Electric Water Heater
1. Turn Off the Power
Safety is paramount. Before starting, ensure the power to your electric water heater is turned off at the circuit breaker. This prevents the risk of electrical shock and protects the heating elements from operating without water.
2. Connect a Hose to the Drain Valve
Locate the drain valve at the bottom of the heater and attach a garden hose. Ensure a secure fit to prevent leaks. Lead the hose to a safe area where water can be drained without causing damage.
3. Open the Pressure Relief Valve
This step is essential for safety and to prevent a vacuum in the tank that could impede water flow. Open the pressure relief valve, typically located on the top of the unit, to allow air into the tank.
4. Drain the Tank
Open the drain valve to let the water flow out. This might take some time depending on the tank size. Draining the tank removes sediment that has built up, improving efficiency and extending the life of the heater.
5. Flush the Tank
After the initial drain, briefly close the valve, turn on the cold water supply to the tank, and allow it to fill partially. Then open the drain valve again to flush any remaining sediment. Repeat this step until the drained water is clear.
6. Close the Drain Valve and Refill the Tank
Once the tank is thoroughly flushed, close the drain valve and remove the hose. Refill the tank by turning on the water supply. Ensure the tank is full before proceeding to the next step to prevent damage.
7. Turn the Power Back On
After the tank is full, restore power to the heater at the circuit breaker. Check for proper operation and ensure there are no leaks around the drain valve.
Flushing a Gas Water Heater
1. Turn Off the Gas Supply
For safety, turn off the gas supply to your water heater. This can be done by setting the thermostat to the pilot position or completely shutting off the gas.
2. Connect a Hose to the Drain Valve
Attach a garden hose to the drain valve located at the bottom of the heater. Ensure the hose is securely fitted and leads to a safe draining area.
3. Open the Pressure Relief Valve
To prevent a vacuum in the tank and allow for a smooth flow, open the pressure relief valve located on the top or side of the heater.
4. Drain the Tank
Open the drain valve to release water and sediment. Depending on the size of your tank, this process may take some time. Be patient as the sediment clears out.
5. Flush the Tank
Close the drain valve temporarily, turn on the water supply to refill the tank partially, and then reopen the drain valve for a thorough flush. Repeat until the water runs clear.
6. Close the Drain Valve and Refill the Tank
After flushing, close the drain valve and detach the hose. Turn on the water supply to refill the tank. Ensure it’s full to avoid damage to the burner.
7. Turn the Gas Supply On
Once the tank is full, turn on the gas supply and set the thermostat to the desired temperature. Light the pilot if it is turned off. Check for proper operation and any signs of leaks.
To see our latest posts Click Here
