
Yes, You Can Use a Pressure Cooker For Canning! Here’s How

Disclosure: As an Amazon Associate, I earn from qualifying purchases. Learn more
Yes, you can use a pressure cooker for canning, but only a certain kind, and only with the right foods. The cooker must hold at least four quart-sized jars standing upright, and it needs a dependable way to read and control pressure. A full-size pressure canner is the reliable choice. Most small stovetop cookers and electric multi-cookers fall short for low-acid foods.
Quick Canner Picks
Worth a look if you want a stovetop canner with a pressure gauge and regulator weight, the All American 1930 Pressure Canner needs no replacement gasket → View on Amazon
If you want automatic pressure control, the NESCO NPC-9 Electric Pressure Canner adds digital presets, a safety lock lid, and included canning and steam racks → View on Amazon
This matters because vegetables, meat, poultry, and seafood must reach 240°F or higher during processing. A boiling water bath tops out around 212°F, which cannot make these foods safe. Botulism is a serious illness that you cannot detect by taste or smell, so equipment and tested recipes decide everything.
If you only plan to make jams, fruit, or pickles, a large pot is enough for water bath canning. For green beans, soups, and meat, plan on a true pressure canner. The sections below show how to choose one, how the process works, and which foods fit which method.
Our Choice
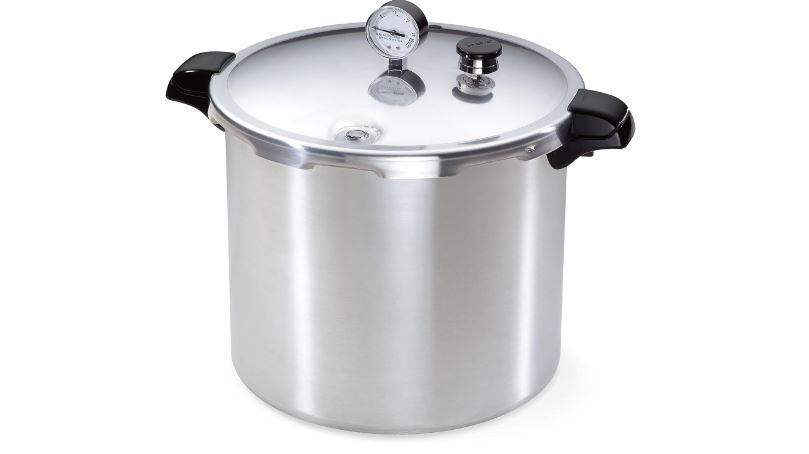
Presto 01781 Pressure Canner
- Doubles as boiling water canner
- Deluxe pressure dial gauge
- Warp-resistant heavy-gauge aluminum
- Works on regular and smooth-top ranges
Related: Best Pressure Cooker for Canning
What Happens If You Try to Can Food in a Pressure Cooker
Using a pressure cooker for canning can result in unsafe internal temperatures, especially for low-acid foods like vegetables, meats, and beans. Unlike a pressure canner, most pressure cookers do not consistently reach or hold 240°F long enough to destroy harmful bacteria.
This increases the risk of botulism, a serious foodborne illness that cannot be detected by taste or smell. Another issue is inaccurate pressure regulation, which can cause under-processing even if jars appear sealed. A sealed lid does not guarantee the food inside is safe.
This is why tested canning guidelines do not recommend pressure cookers for standard home canning. Understanding these risks helps explain why the answer to can you use a pressure cooker for canning is usually no for safe, long-term food storage.
Which Canning Method Fits High Acid and Low Acid Food?
Acidity decides the method, not the pot you happen to own. Match the food first, then pick the equipment.
Fruits, jams, jellies, and pickles: A boiling water bath suits these high acid foods. The food reaches about 212°F, which is enough for acidic recipes.
Tomatoes: Follow a tested recipe closely, because tomatoes usually need added acid to be safe.
Vegetables, beans, and corn: These low acid foods need pressure canning, where temperatures reach 240 to 250°F.
Meat, poultry, and seafood: Pressure canning only, with no shortcuts and no substitutions.
Soups, stews, and broths: Low acid overall, so use pressure canning with a tested recipe.
A water bath never replaces pressure canning: Boiling longer does not raise the temperature, so a low acid food stays under-processed.
What to Check Before and After Pressure Canning
Most pressure canning problems come from small oversights, not from the pot itself. A short routine catches most of them.
Start with the gauge. If your canner has a dial gauge, have it tested before canning season, which many extension offices offer. A weighted gauge does not need that test.
Next, vent steam before you start the timer. Let a steady stream escape for about 10 minutes, then close the vent. Check your canner’s manual, since designs differ.
Use only tested recipes from a trusted source such as the National Center for Home Food Preservation. A colleague once asked me about this, and my answer is always to follow the tested time and jar size exactly.
Before eating, inspect every jar. Throw out any with a bulging lid, leaks, spurting liquid, foam, or an off smell, and never taste food to test it.
What is the Best Pressure Cooker for Canning?
The best choice is a pressure canner, or a large stovetop cooker made for canning jars, with a clear way to read pressure. A few features matter more than extras.
- Capacity for at least four quart jars standing upright
- A dial gauge or a weighted gauge, with a dial gauge tested before each season
- A locking lid and a rack that keeps jars off the bottom
- A manual with processing guidance that follows USDA recommendations
The Presto 01781 is a 23-quart canner made of warp-resistant heavy-gauge aluminum. It holds 26 half-pints, 20 pints, or 7 quarts, and it works on regular and smooth-top ranges. It includes a deluxe pressure dial gauge, a canning and cooking rack, and a 76-page instruction and recipe book. It also works as a boiling water canner for fruits, jams, jellies, pickles, and salsa.
Good For: Large batches of vegetables, meats, poultry, and seafood, plus water bath jobs like jams and pickles.
Think Twice If: You have little storage space or only can small batches. A canner this large is heavy when full, so check your range manual before using it on a smooth-top.
Canning in a Pressure Cooker: The Process
Canning in a pressure cooker is a process that involves using a specialized pot to preserve food in jars at high temperatures. This method is essential for ensuring the safety and longevity of canned foods, particularly low-acid items.
1. Preparation of Jars and Ingredients
The first step in pressure canning involves preparing the jars and the food items to be canned. This includes thoroughly washing and sterilizing the jars and lids. The food items, whether they are fruits, vegetables, meats, or prepared dishes, need to be prepared according to specific recipes.
Each ingredient must be cleaned, cut, or cooked as required. Ensuring cleanliness and proper preparation is key to preventing contamination and ensuring the quality of the canned goods.
2. Filling Jars
Once the jars and food are ready, the next step is to fill the jars. This needs to be done carefully, ensuring the right amount of headspace is left at the top of the jar, as recommended in the canning recipes.
The headspace is critical as it allows for the expansion of food and steam during the canning process. Overfilling can lead to spillage and under-processing, while too little can cause discoloration and oxidation of food.
3. Sealing and Placing in Pressure Cooker
After filling, the jars are sealed with the sterilized lids and rings. They are then placed inside the pressure cooker. It is important to arrange the jars so they do not touch each other or the sides of the cooker. This arrangement ensures even heating and prevents jar breakage.
4. Processing in the Pressure Cooker
With the jars in place, water is added to the pressure cooker, follow your canner’s manual for the water amount. The lid of the pressure cooker is then securely locked, and the heat is turned on. As the water boils, it creates steam, which increases the pressure inside the cooker.
The processing time begins once the cooker reaches the desired pressure, which varies based on the altitude and the specific recipe.
5. Adjusting for Altitude
Altitude plays a significant role in pressure canning. The higher the altitude, the lower the boiling point of water. This means adjustments in pressure settings are necessary to achieve the required temperature for safe canning. Most canning recipes provide guidelines for these adjustments.
6. Cooling and Storage
After the processing time is complete, the cooker is removed from the heat and allowed to cool down naturally. This step is crucial as it completes the cooking process and forms a vacuum seal in the jars.
Once cooled, jars are removed from the cooker and stored in a cool, dark place. The seal of each jar should be checked before storage; any jars that have not been sealed properly need to be refrigerated and consumed quickly or reprocessed.
Can You Use a Pressure Cooker as a Pressure Canner?
Using a pressure cooker as a pressure canner is a topic of much discussion among home canning enthusiasts. The primary function of an Instant/pressure cooker is to cook food quickly under high pressure, while a pressure canner is specifically designed for canning foods to preserve them.
Pressure cookers generally have a smaller capacity compared to pressure canners, making them less ideal for processing large batches of jars.
Also, pressure cookers heat up and cool down more rapidly than pressure canners, which can affect the processing time and temperature, crucial factors in ensuring the safety of canned food.
Most importantly, the pressure in cookers may not be as accurately regulated as in canners. This is critical because the safety of canning, especially low-acid foods, depends on maintaining the correct pressure for the right amount of time.
Using a pressure cooker for canning could pose a risk of underprocessing, which might lead to foodborne illnesses.
Some newer models of pressure cookers come with canning settings, but it’s essential to ensure they meet the necessary standards for canning and are verified by a reliable source such as the National Center for Home Food Preservation.
Pressure Cooker vs Pressure Canner
The main difference between a pressure cooker and a pressure canner lies in their intended use and design. A pressure cooker is primarily designed for cooking foods quickly under high pressure.
It’s ideal for making meals faster, as the high pressure raises the boiling point of water, cooking food at a higher temperature than possible in a regular pot.
Pressure cookers are available in various sizes, but they are generally smaller and heat up and cool down more rapidly compared to pressure canners.
In contrast, a pressure canner is specifically designed for canning and preserving food. It operates at a specific pressure level necessary for safely canning different types of food, especially low-acid foods like meats, vegetables, and some fruits.
Pressure canners are larger, allowing multiple jars to be processed simultaneously. They also have more precise temperature and pressure controls, essential for ensuring the safety and longevity of canned goods.
Pressure canners maintain their temperature and pressure more evenly and for longer periods, which is vital for the canning process.
How Altitude Adjustments Differ Between Pressure Cookers and Canners
Pressure canners require altitude adjustments to ensure proper sterilization, but pressure cookers do not account for these changes. At higher elevations, water boils at lower temperatures, requiring increased pressure to reach safe canning conditions. Pressure canners have guidelines for adjusting pounds of pressure based on altitude, while most pressure cookers lack this feature.
Failing to adjust for altitude in canning can result in underprocessed food, leading to spoilage or bacterial growth. Pressure cookers also lose pressure faster when opened, unlike canners designed to maintain stability. For reliable home canning, especially in high-altitude areas, a dedicated pressure canner is the only safe option.
Canning Green Beans in a Pressure Cooker
Plain green beans are a low-acid food, so they must be processed in a pressure canner. A boiling water bath is never safe for them. Use a canner that meets the size rule, and follow the manual for your model.
Step 1: Prepare the Canner and Jars
Check that the vent, lid, and gauge are clean and working. Wash jars, lids, and bands in hot soapy water, and keep the jars hot until you fill them.
Step 2: Prepare the Beans
Wash the beans, snap off the ends, and cut them to length. For a raw pack, leave them as they are. For a hot pack, boil them for 5 minutes first. You do not need to chill them in ice water.
Step 3: Pack the Jars
Fill the jars, leaving 1 inch of headspace. Add salt only if you like, about half a teaspoon per pint or 1 teaspoon per quart. Cover with boiling water, keeping the 1 inch of headspace.
Step 4: Remove Air Bubbles and Seal
Slide a non-metallic tool along the jar to release air, then recheck the headspace. Wipe the rims, set the lids, and tighten the bands until fingertip tight.
Step 5: Vent and Pressurize
Load the jars on the rack and lock the lid. Let steam flow steadily from the vent for 10 minutes, then add the weight or close the vent. Start timing only once the canner reaches the right pressure.
Step 6: Process
Process pints for 20 minutes and quarts for 25 minutes. The time does not change with altitude, but the pressure does.
- Dial gauge: 11 pounds up to 2,000 ft, 12 pounds at 2,001 to 4,000 ft, 13 pounds at 4,001 to 6,000 ft, and 14 pounds at 6,001 to 8,000 ft.
- Weighted gauge: 10 pounds up to 1,000 ft and 15 pounds above 1,000 ft.
Step 7: Cool Down Safely
Turn off the heat and let the pressure drop to zero on its own. Take off the weight, wait about 10 minutes, then open the lid away from your face. Let the jars cool without disturbing them.
Best Canning Recipes for Pressure Cooker
Not every canning recipe needs a pressure canner. Acidity decides the method, and every recipe below should come from a tested source such as the National Center for Home Food Preservation. Never change the ingredients or proportions.
Tomato Sauce
Tomatoes sit near the edge of the acid range, so tested recipes add bottled lemon juice or citric acid. Follow the recipe for the method and time, because meat or extra vegetables in the sauce change the requirements.
Apple Butter
Fruit spreads are high in acid and are normally processed in a boiling water bath, not a pressure canner. Use a tested recipe for the time and jar size.
Beef Stew
Meat and vegetables are low-acid, so this needs a pressure canner and a tested recipe. Do not add flour or other thickeners before canning, and thicken the stew when you reheat it.
Chicken Soup
Pressure canning is the only safe option. Leave out noodles, rice, and thickeners before canning, and add them when you reheat. Use a tested soup recipe and process for the time that matches your jar size.
Salsa
Acid levels protect salsa, so stick to a tested recipe and never swap in more low-acid vegetables or reduce the vinegar or lemon juice. These recipes are processed in a boiling water bath.
Pickles
Vinegar makes pickles high-acid, so a boiling water bath is the standard method. Keep the vinegar strength and ratios exactly as the tested recipe states.
Peach Jam
Like other jams, peach jam is high-acid and goes in a boiling water bath. Follow the recipe’s pectin and sugar amounts so it sets and stays safe.
